热衷学习,热衷生活!😄
沉淀、分享、成长,让自己和他人都能有所收获!😄
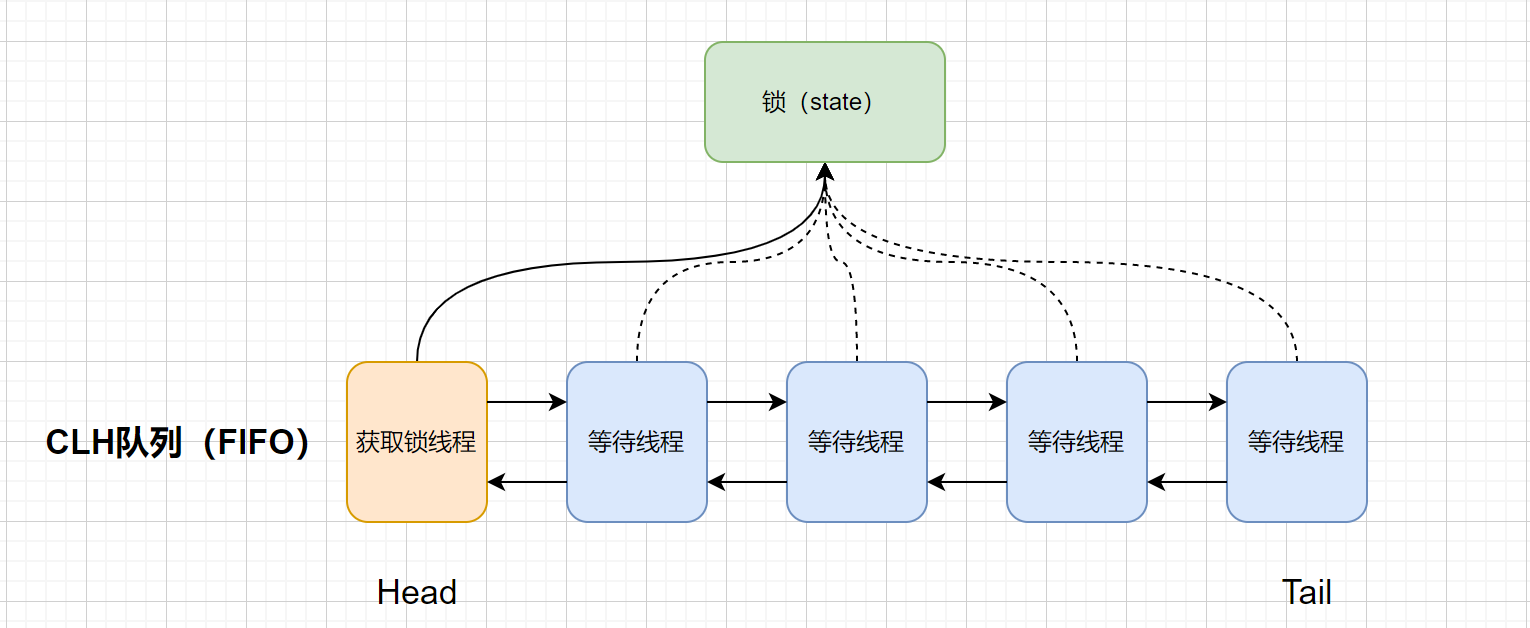
一、AbstractQueuedSynchronizer简介 AQS(AbstractQueuedSynchronizer)是并发容器JUC(java.util.concurrent)下locks包内的一个抽象类,是一个同步器,是用来构建锁或者其他同步组件的基础框架,内部维护了一个成员变量state表示同步状态,state=0表示线程未获取到锁,state > 0表示获取到锁,state > 1表示重入锁的数量,被 volatile修饰保证了可见性,通过CAS操作对其修改,内置维护了FIFO队列实现对未获取到锁的线程进行排队工作。
二、AbstractQueuedSynchronizer源码解析 核心成员变量 1 2 3 4 5 6 7 8 9 10 11 12 13 14 15 16 17 18 19 20 21 22 23 24 public abstract class AbstractQueuedSynchronizer extends AbstractOwnableSynchronizer implements java .io.Serializable { private transient volatile Node head; private transient volatile Node tail; private volatile int state; }
AbstractQueuedSynchronizer主要有三个核心成员变量state、head、tail
state:表示锁的状态, 等于0表示未锁定,大于0表示已锁定,大于1表示可重入锁,重入锁的次数。被volatile修饰保证了可见性。head:等待队列的头节点,除了初始化只能通过setHead()方法设置值,如果head存着能保证waitStatus状态不为CANELLED。tail:等待队列尾节点,只能通过equ添加新的等待节点。
Node节点 AbstractQueuedSynchronizer内部维护着FIFO队列,也就是CLH队列,这个队列的每一个元素都是一个Node,所以我们接下来要了解其他其内部类Node,源码如下:
1 2 3 4 5 6 7 8 9 10 11 12 13 14 15 16 17 18 19 20 21 22 23 24 25 26 27 28 29 30 31 32 33 34 35 36 37 38 39 40 41 42 43 44 45 46 47 48 49 50 51 52 53 54 55 56 57 58 59 60 61 62 63 64 65 66 67 68 69 70 71 72 73 74 75 76 77 78 79 80 81 82 83 84 85 86 87 88 89 90 91 92 93 94 95 96 97 98 private static class Node { static final Node SHARED = new Node (); static final Node EXCLUSIVE = null ; static final int CANCELLED = 1 ; static final int SIGNAL = -1 ; static final int CONDITION = -2 ; static final int PROPAGATE = -3 ; volatile int waitStatus; volatile Node prev; volatile Node next; volatile Thread thread; Node nextWaiter; final boolean isShared () { return nextWaiter = = SHARED; } final Node predecessor () throws NullPointerException { Node p = prev; if (p == null ) { throw new NullPointerException (); } else { return p; } } Node () { } Node(Thread thread, Node mode) { this .nextWaiter = mode; this .thread = thread; } Node (Thread thread, int waitStatus) { this .thread = thread; this .waitStatus = waitStatus; } }
核心方法 JUC里面的工具类基本都是基础AQS实现的,比ReentrantLock 、CountDownLatch、CyclicBarrier、Semaphore等,有的只支持独占锁,如ReentrantLock#lock(),有的支持共享锁,如Semaphore,从前文的Node类的定义也能看到
1 2 3 4 5 6 7 8 9 static final Node SHARED = new Node ();static final Node EXCLUSIVE = null ;
AQS实现了两套加锁解锁的方式,那就是独占锁 和共享锁 。我们就从AQS最常用的类ReentrantLock来学习AQS的核心方法。
三、ReentrantLock 简介 ReentrantLock是基础AQS实现的一个可重入且独占式锁。内置了一个Sync同步器类实现了AQS,且支持公平锁和非公平锁,其实现类分别是FairSync和NonfairSync。
ReentrantLock所有操作都是通过核心内部类Sync操作,由子类FairSync和NonfairSync实现。
1 private final Sync sync;
ReentrantLock加锁过程 lock lock()就是加锁,该方法定义如下:
1
2
3
public void lock () { sync.lock(); }
FairSync和NonfairSync具体实现:
1 2 3 4 5 6 7 8 9 10 11 12 13 14 15 16 17 18 final void lock () { acquire(1 ); } final void lock () { if (compareAndSetState(0 , 1 )) setExclusiveOwnerThread(Thread.currentThread()); else acquire(1 ); } protected final void setExclusiveOwnerThread (Thread thread) { exclusiveOwnerThread = thread; }
可以看到非公平锁多了一个compareAndSetState()操作,通过CAS尝试修改锁状态state的值,如果修改成功设置当前线程以独占的方式获取了锁,修改失败执行的逻辑和公平锁一样。
公平锁和非公平锁获取独占锁的核心逻辑都是acquire()方法,接下来就看看这个方法。
acquire acquire该方法是父类AbstractQueuedSynchronizer定义的方法,源码如下:
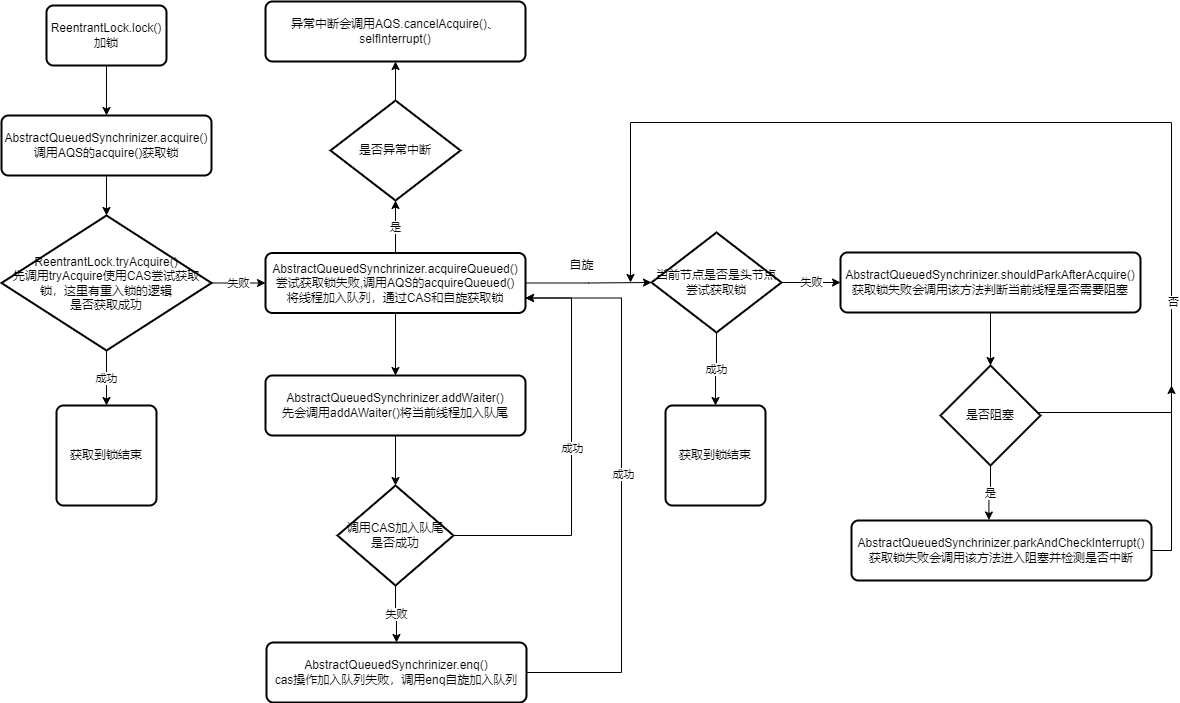
1
2
3
4
5
public final void acquire (int arg) { if (!tryAcquire(arg) && acquireQueued(addWaiter(Node.EXCLUSIVE), arg)) selfInterrupt(); }
该方法主要调用tryAcquire方法尝试获取锁,成功返回true表示获取到了锁,如果失败就将线程封装成节点插入队尾。
tryAcquire tryAcquire方法在类AbstractQueuedSynchronizer没有直接实现,采用模版方法 的设计模式交给子类实现,先看公平锁FairSync的实现,源码如下:
1
2
3
4
5
6
7
8
9
10
11
12
13
14
15
16
17
18
19
20
21
22
23
24
25
26
27
protected final boolean tryAcquire (int acquires) { final Thread current = Thread.currentThread(); int c = getState(); if (c == 0 ) { if (!hasQueuedPredecessors() && compareAndSetState(0 , acquires)) { setExclusiveOwnerThread(current); return true ; } } else if (current == getExclusiveOwnerThread()) { int nextc = c + acquires; if (nextc < 0 ) throw new Error ("Maximum lock count exceeded" ); setState(nextc); return true ; } return false ; }
从上面源码可以看出该方法就是独占的方式获取锁,获取成功后返回true,重入锁的逻辑也是在这里实现,主要通过修改state的值来记录获取锁的次数。
非公平锁的实现大同小异就是少了!hasQueuedPredecessors()的判断,因为是非公平锁嘛,所以不需要判断阻塞时间了。
acquire()方法除了调用tryAcquire()方法外还调用了acquireQueued(addWaiter(Node.EXCLUSIVE), arg),这里有两个方法,我们先看addWaiter()方法。
addWaiter 该方法相当于把当前线程封装成一个节点Node,并加入队列,这个方法我们在上面有写过,源码如下:
1 2 3 4 5 6 7 8 9 10 11 12 13 14 15 16 17 18 19 20 21 22 23 24 private Node addWaiter (Node mode) { Npde node = new Node (Thread.currentThread(), mode); Node pred = tail; if (pred == null ) { node.prev = pred; if (compareAndSetTail(pred, node)) { pred.next = node; return node; } } enq(node); retur node; }
enq enq方法是将节点加入队列队尾,必要时要进行初始化,通过自旋+CAS的方式保证线程安全和插入成功。源码如下:
1 2 3 4 5 6 7 8 9 10 11 12 13 14 15 16 17 18 19 20 21 22 23 24 25 26 27 private Node enq (final Node node) { for (;;) { Node t = tail; if (t == null ) { if (compareAndSetHead(new Node ())) { tail = head; } } else { node.prev = t; if (compareAndSetTail(t, node)) { t.next = node; return t; } } } }
可以看出该方法就是往队列插入尾节点,通过自旋+CAS的方式,需要注意的是该方法返回的Node节点不是新插入的节点,而是新插入节点的前一节点。
enq()方法中调用的compareAndSetHead()、compareAndSetTail()方法如下:
1 2 3 4 5 6 7 8 9 10 11 12 13 14 private final boolean compareAndSetHead (Node update) { return unsafe.companreAndSwapObject(this , headOffset, null , update); } private final boolean compareAndSetTail (Node expect, Node update) { return unsafe.compareAndSwapObject(this , tailOffset, expect, update); }
acquireQueued acquireQueued()方法作用就是获取锁,如果没有获取到锁就让当前线程阻塞等待,源码如下:
1 2 3 4 5 6 7 8 9 10 11 12 13 14 15 16 17 18 19 20 21 22 23 24 25 26 27 28 29 30 31 32 33 34 35 36 37 38 39 40 41 42 43 44 45 46 final boolean acquireQueued (final Node node, int arg) { boolean failed = true ; try { boolean interrupted = false ; for (;;) { final Node p = node.predecessor(); if (p == head && tryAcquire(arg)) { setHead(node); p.next = null ; failed = false ; return interrupted; } if (shouldParkAfterFailedAcquire(p, node) && parkAndCheckInterrupt()) { interrupted = true ; } } } finally { if (failed) cancelAcquire(node); } }
acquireQueued方法主要流程如下:
通过for(;;)死循环自旋,直到node(当前)节点获取到锁。
获取当前节点的前一个节点p。
如果节点p是头节点,然后调用tryAcquire()尝试获取锁,如果获取成功就将node节点设置成头节点然后返回。
如果节点p不是投节点或者获取锁失败,调用shouldParkAfterFaildAcquired()方法来决定是否要阻塞当前线程。
如果要阻塞当前线程,调用parkAndCheckInterrupt()方法阻塞当前线程。
如果当前线程发生异常,非正常退出,调用cancelAcquire()方法将当前节点的状态设置成取消。
shouldParkAfterFailedAcquire shouldParkAfterFailedAcquire()用于判断当前线程是否需要阻塞,源码如下:
1 2 3 4 5 6 7 8 9 10 11 12 13 14 15 16 17 18 19 20 21 22 23 24 25 26 27 private static boolean shouldParkAfterFailedAcquire (Node pred, Node node) { int ws = pred.waitStatus; if (ws == Node.SINGAL) { return true ; } if (ws > 0 ) { do { node.prev = pred = pred.prev; } while (pred.waitStatus > 0 ); pred.next = node; } else { compareAndSetWaitStatus(pred, ws, Node.SIGNAL); } return false ; }
这个方法是根绝前一个节点状态来判断当前线程是否需要被阻塞,前一节点的状态也是在这个方法中修改的,通过compareAndSetWaitStatus()方法。
shouldParkAfterFailedAcquire()方法主要流程如下:
如果前一节点状态是Node.SIGNAL,则直接返回true当前线程进入阻塞状态。
如果前一节点状态是Node.CANCELLED(大于0就是CANCELLED),表示前一个节点已经被唤醒了,要从队列中移动CANCELLED状态的节点,所以送pred节点一直向前查询不是CANCELLED状态的节点,并将该节点赋值成当前节点的前一节点,表示当前节点的前一节点发生变化,在acquireQueued()方法中进行下一次循环。
不是前面两种状态,只能是0或者PROPAGATE状态,修改前一节点的状态为Node.SIGNAL,下一次循环时阻塞当前线程。
parkAndCheckInterrupt 该方法用于阻塞当前线程并检测线程是否被中断,源码如下:
1 2 3 4 5 6 7 8 9 private final boolean parkAndCheckInterrupt () { LockSupport.park(this ); return Thread.interrupted(); }
cancelAcquire cancelAcquire()方法在acquireQueued()方法异常的时候调用,用于将当前节点的状态设置成CANCELLED,源码如下:
1 2 3 4 5 6 7 8 9 10 11 12 13 14 15 16 17 18 19 20 21 22 23 24 25 26 27 28 29 30 31 32 33 34 35 36 37 38 39 40 41 42 43 44 45 private void cancelAcquire (Node node) { if (node == null ) return ; node.thread = null ; Node pred = node.prev; while (pred.waitStatus > 0 ) node.prev = pred = pred.prev; Node predNext = pred.next; node.waitStatus = Node.CANCELLED; if (node == tail && compareAndSetTail(node, pred)) { compareAndSetNext(pred, predNext, null ); } else { int ws; if (pred != head && ((ws = pred.waitStatus) == Node.SIGNAL || (ws <= 0 && compareAndSetWaitStatus(pred, ws, Node.SIGNAL))) && pred.thread != null ) { Node next = node.next; if (next != null && next.waitStatus <= 0 ) compareAndSetNext(pred, predNext, next); } else { unparkSuccessor(node); } node.next = node; } }
加锁过程总结
首先调用lock()方法,这个方法有两个子类FairSync和NofairSync实现,表示公平锁和非公平锁,两个类的不同就是NofairSync会直接调用compareAndSetStaus()方法修改加锁状态,如果成功当前线程获取到锁。
然后调用父类AbstractQueuedSynchronized的acquire()方法获取锁。
acquire()方法调用tryAcquire()方法尝试获取锁,tryAcquire()由子类FairSync和NofairSync实现分别调用fairTryAcquire()和nonfairTryAcquire()方法尝试获取锁。这两个方法里面实现了重入锁的逻辑,如果当前锁状态是未获取到锁,则调用CAS设置锁状态,如果是获取到锁状态则会判断获取锁的线程是否是当前线程,如果是则是重入锁的逻辑记录当前线程获取锁的次数。如果tryAcquire()方法调用获取锁失败,则会调用acquireQueued()方法再获取锁或者进入阻塞状态,acquireQueued()方法首先调用了addWaiter()方法用于将当前线程封装成一个节点加入队列队尾,然后再调用acquireQueued()方法获取锁或者进入阻塞状态,acquireQueued()方法会通过自旋的方式根绝当前节点状态判断是否进入阻塞状态。当别的线程释放锁的时候,可能唤醒这个线程,再调用tryAcquire()方法获取锁。
如果发生异常,将当前节点状态设置成CANCELLED。
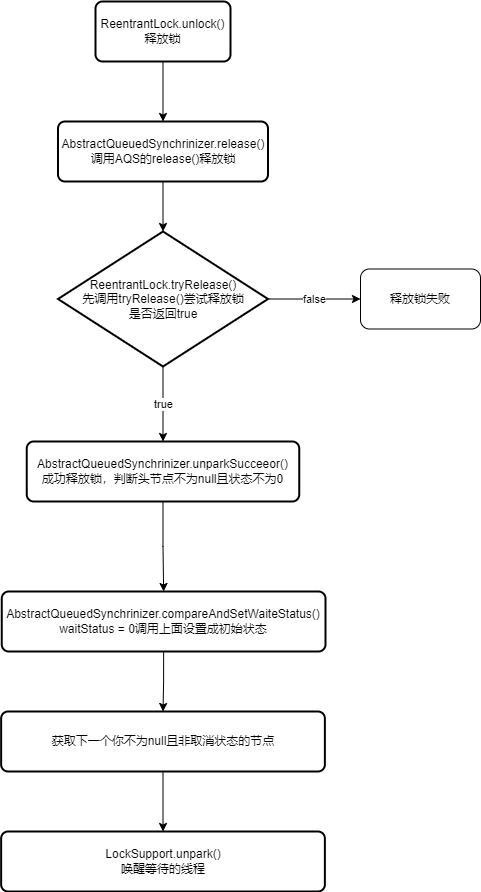
ReentrantLock释放锁过程 unlock 调用unlock()方法释放锁,然后调用release()方法,源码如下:
1
2
3
public void unlock () { sync.release(1 ); }
release release是AbstactQueuedSynchronized定义的方法用于释放锁,源码如下:
1 2 3 4 5 6 7 8 9 10 11 12 13 14 15 public final boolean release (int arg) { if (tryRelease(arg)) { Node h = head; if (h != null && h.waitStatus != 0 ) unparkSuccessor(h); return true ; } return false ; }
release()释放锁流程如下:
调用tryRelease()方法尝试释放锁,返回true表示释放锁成功,返回false表示还持有锁资源。
如果释放锁成功了,且头节点不为null,就要唤醒被阻塞的线程,调用unparkSuccessor()方法唤醒一个等待的线程。
tryRelease tryRelease尝试释放锁方法是有子类实现的,下面是ReentrantLock中Sync的tryRelease()方法实现:
1
2
3
4
5
6
7
8
9
10
11
12
13
14
15
16
17
18
protected final boolean tryRelease (int releases) { int c = getState() - releases; if (Thread.currentThread() != getExclusiveOwnerThread()) throw new IllegalMonitorStateException (); boolean free = false ; if (c == 0 ) { free = true ; setExclusiveOwnerThread(null ); } setState(c); return free; }
tryRelease()尝试释放锁流程如下:
首先获取新的锁状态
判断当前线程是否是获取独占锁的线程,如果不是抛异常。
如果新的锁状态是未锁定状态,获取独占锁的线程置为null,新的锁状态置为未锁定。
unparkSuccessor unparkSuccessor()方法用于唤醒node节点下一节点非取消状态的节点所在线程,源码如下:
1 2 3 4 5 6 7 8 9 10 11 12 13 14 15 16 17 18 19 20 21 22 23 24 25 private void unparkSuccessor (Node node) { int ws = node.waitStatus; if (ws < 0 ) compareAndSetWaitStatus(node, ws, 0 ); Node s = node.next; if (s == null || s.waitStatus > 0 ) { s = null ; for (Node t = tail; t != null && t!= node; t = t.prev) if (t.waitStatus <= 0 ) s = t; if (s != null ) LockSupport.unpark(s.thread); } }
unparkSuccessor()方法唤醒node节点的下一个非取消状态的节点所在线程流程如下:
先将node节点的状态设置为0。
寻找下一个状态不为取消的节点s。
如果节点s不为null,调用LockSupport.unpark()方法唤醒s所在线程。
释放锁过程总结
先调用tryRelease()方法尝试释放当前持有的锁资源。
如果成功释放了锁资源,则调用unparkSuccessor()方法去唤醒一个等待锁的线程。
四、总结
到这里ReentrantLock加锁释放锁的过程已经学习完毕,ReentrantLock是基于AQS实现的独占式锁 ,内部维护了一个FIFO队列实现未获取到锁的线程进行排队工作, ReentrantLock内部有FairSync(公平锁)和NonfairSync(非公平锁)两种实现,通过调用lock()方法加锁,调用unlock()方法解锁。
五、自己实现一个可重入的独占锁 通过继承AbstractQueuedSynchronizer 类重写tryAcquire()和tryRelease()方法实现自定义的可重入独占锁。
代码如下:
1
2
3
4
5
6
7
8
9
10
11
12
13
14
15
16
17
18
19
20
21
22
23
24
25
26
27
28
29
30
31
32
33
34
35
36
37
38
39
40
41
42
43
44
45
46
47
48
49
50
51
52
53
54
55
56
57
58
59
60
61
62
63
64
65
66
67
68
69
70
71
72
73
74
75
76
77
78
79
80
81
82
83
84
85
86
87
88
89
90
91
92
public class SyncLock extends AbstractQueuedSynchronizer { @Override protected boolean tryAcquire (int acquires) { final Thread current = Thread.currentThread(); int c = getState(); if (c == 0 ) { if (compareAndSetState(0 , acquires)) { setExclusiveOwnerThread(current); return true ; } } else if (current == getExclusiveOwnerThread()) { int nextc = c + acquires; if (nextc < 0 ) { throw new Error ("Maximum lock count exceeded" ); } setState(nextc); return true ; } return false ; } @Override protected boolean tryRelease (int releases) { int c = getState() - releases; if (Thread.currentThread() != getExclusiveOwnerThread()) throw new IllegalMonitorStateException (); boolean free = false ; if (c == 0 ){ free = true ; setExclusiveOwnerThread(null ); } setState(c); return free; } } class AQSTest { public static void newThread (SyncLock syncLock, String name, int time) { new Thread (new Runnable () { @Override public void run () { System.out.println("线程" + Thread.currentThread().getName() + "开始运行, 准备获取锁。" ); syncLock.acquire(1 ); try { System.out.println("线程" + Thread.currentThread().getName() + ", 在run方法获取了锁。" ); lockAgain(); try { Thread.sleep(time); } catch (InterruptedException e) { e.printStackTrace(); } } finally { System.out.println("线程" +Thread.currentThread().getName()+" 在run方法中释放了锁。" ); syncLock.release(1 ); } } private void lockAgain () { syncLock.acquire(1 ); try { System.out.println("线程" + Thread.currentThread().getName() + ", 在lockAgain方法获取了锁。" ); try { Thread.sleep(10 ); } catch (InterruptedException e) { e.printStackTrace(); } } finally { System.out.println("线程" +Thread.currentThread().getName()+" 在lockAgain方法中释放了锁。" ); syncLock.release(1 ); } } }, name).start(); } public static void main (String[] args) { SyncLock syncLock = new SyncLock (); newThread(syncLock, "t1111" , 1000 ); newThread(syncLock, "t2222" , 1000 ); newThread(syncLock, "t3333" , 1000 ); newThread(syncLock, "t4444" , 1000 ); } }
上面代码测试结果如下:
1
2
3
4
5
6
7
8
9
10
11
12
13
14
15
16
17
18
19
20
线程t1111开始运行, 准备获取锁。 线程t2222开始运行, 准备获取锁。 线程t1111, 在run方法获取了锁。 线程t1111, 在lockAgain方法获取了锁。 线程t4444开始运行, 准备获取锁。 线程t3333开始运行, 准备获取锁。 线程t1111 在lockAgain方法中释放了锁。 线程t1111 在run方法中释放了锁。 线程t2222, 在run方法获取了锁。 线程t2222, 在lockAgain方法获取了锁。 线程t2222 在lockAgain方法中释放了锁。 线程t2222 在run方法中释放了锁。 线程t4444, 在run方法获取了锁。 线程t4444, 在lockAgain方法获取了锁。 线程t4444 在lockAgain方法中释放了锁。 线程t4444 在run方法中释放了锁。 线程t3333, 在run方法获取了锁。 线程t3333, 在lockAgain方法获取了锁。 线程t3333 在lockAgain方法中释放了锁。 线程t3333 在run方法中释放了锁。
六、ReentrentLock和synchronized的比较 相同点:
都是加锁方式同步
都是重入锁。
都是通过阻塞的方式实现同步。
不同点
原始构成:synchronized是java语言的关键字,是原生语法层面的互斥,由JVM实现,而ReentrentLock是JDK1.5之后提供的API层面的互斥锁。
实现:synchronized是通过JVM实现加锁解锁,而ReentrentLock是API层面的加锁解锁,需要手动解锁。
代码编写:synchronized不需要手动释放锁,修饰方法或者代码块,而ReentrentLock必须手动释放锁,如果没有释放锁可能造成死锁现象。需要lock()和unlock()方法配合try/finally语句块完成。
灵活性:synchronized只能用于修饰方法或者代码块,灵活性低,而ReentrentLock是方法调用可以跨方法,灵活性高。
是否等待可中断:synchronized不可中断,除非抛出异常,而ReentrentLock是可以中断的,如果持有锁的线程长期不释放锁,正在等待的线程可以选择放弃等待,通过设置超时时间方法。
是否公平锁:synchronized是不公平锁,而ReentrentLock是可公平锁也可不公平锁。
实现原理:synchronized是通过编译,会在同步代码块前后分别生成monitorenter和monitorexit两个指令实现同步,在执行monitorenter的指令时会尝试获取锁,获取锁成功会通过计数器+1,执行完毕之后会执行monitorexit执行计数器-1,当计数器为0时释放锁,如果获取锁失败就会进入阻塞状态,而ReentrentLock是通过CAS + CLH队列实现,通过CAS原子性操作实现对锁状态state的修改,通过CLH队列实现对未获取到锁的线程进行排队工作。
 wechat
 alipay


